The WordPress administrator provides you many features and functionality to easily manage your WordPress website. So after installing WordPress, we will see how can we manage it with WordPress admin.


I have described all the options available in WordPress admin for approx all versions. I would like to give you a link to check live WordPress demo.
Administrator Login:
To login into the administrator panel, type http://yoursitename/wp-admin on your browser and press enter. You will get a page for username and password enter the login details then click the login button.WordPress Dashboard:
After login, you will get WordPress dashboard. As you can see in the picture, you will get various options. Let's take a deep look at these options.
1. Admin Bar: You can see the admin bar at the top of the screen.
You will find the following options in the bar.
- WordPress logo: When you will take your mouse pointer to logo, you will see the following list of sub-menus.
- About WordPress: This will show you a page with the information of your current WordPress version.
- WordPress.org: It will take you to wordpress.org
- Documentation: It will show you the documentation of WordPress.
- Support Forums: It will take you to the WordPress support forum.
- Feedback: You can send your request and feedback to WordPress.
- My WordPress Menu: My WordPress is a site name. Whatever site name you will give, it will show here. When you will take your mouse pointer on this menu, it will show you "visit site" dropdown. It will navigate you to your site.
- Updates: It is on the right side of My WordPress menu. If updates available it will show you the numbers of updates.
- Comments: The number with the comment icon show the number of unapproved comments. In addition, You will go to the comments moderation page by clicking this menu.
- + New: When you will move your mouse pointer to this menu, you will see a list of following submenu:
- Post: When you will click on the post, a page will open to adding new post.
- Media: When you will click on media, you will see a file Uploader. You can upload new media from this page.
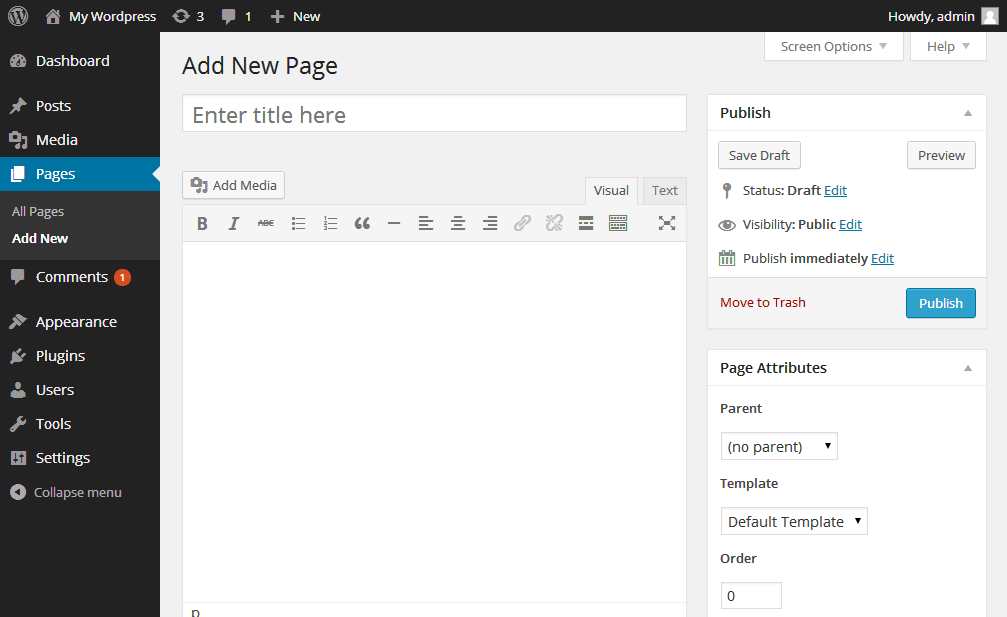
- Page: You can add a new page from here.
- User: You can add a new user from this page.
2. Admin Menu (Left navigation).
- Dashboard: You will see two options under this menu.
- Home: It is a welcome/main page of the admin. You can see all the activities of your website on this page.
- Updates: After clicking on this menu, you can see WordPress updates page. You can update WordPress, plugins and themes easily from this page.
- Post: When you will take your mouse pointer on this menu, you will see the following sub-menus:
- All Post: You will see the list of posts on this page. Take your mouse pointer on the post to see the options to edit, delete or view your post. Quick edit, bulk edit and delete options are also available here.
- Add New: You can create a post from this page. Various other options are also available here such as
- Save draft: To saving the post without publishing.
- Preview: You can see how the post will look on your website.
- Status: You can set the post status to Draft or for pending review
- Visibility: You will get three options for a post visibility - Public, Password protected and private.
- Publish: You can set a future date and time to publish your post.
- Move to trash: By this link, you can move your post to trash
- Format: You will get various format in this section to style your post.
- Categories: You can add/select categories for your post. It will help you to categorize your content. Useful to make navigations.
- Tags: Make a group of content with the help of a tag. Adding tags to post will help people to find your content.
- Featured image: It is a thumbnail and display with the post.
- Add Media: From this option, you can add images, audios and videos files to the post.
- Text editor: You will get two options with the editor first visual and second text. In visual you can see your formatted post as you wrote it and in text, post will display with some HTML tags. You can use text to format your post.
- Media
- Library: You can find the list of media (images, audios, videos) files here.
- Add New: You can upload audio, video and image to your media library.
- Pages
- All Pages: List of all pages of your blog. You will get the same options as you have seen in All Post section.
- Add New: You can add pages to your blog such as contact us, about us, static front page and so on.
- Comments: In this section, you can edit or delete comments, mark comments as spam, move it to the trash, and send a reply.
- Appearance
- Themes: You will find a list of installed themes in this section. You can also search and install new themes from here. You will also get an option to customize the default theme.
- Widgets: Widgets are used to add extra features to your sidebars.
- Menus: You can create navigation for your site from here.
- Header: If a theme support this functionality, you will get this option to add a header image.
- Background: You can add/remove images or color of the background of your site.
- Editor: It is a default editor to edit WordPress files, especially for the theme.
- Plugins
- Installed Plugins: List of all installed plugin. You can edit, delete, activate or deactivate the plugin from here.
- Add New: You can search and install new plugins from here. You can also upload plugin files to install by clicking on the upload link on this page.
- Editor: You can edit files of plugins from here.
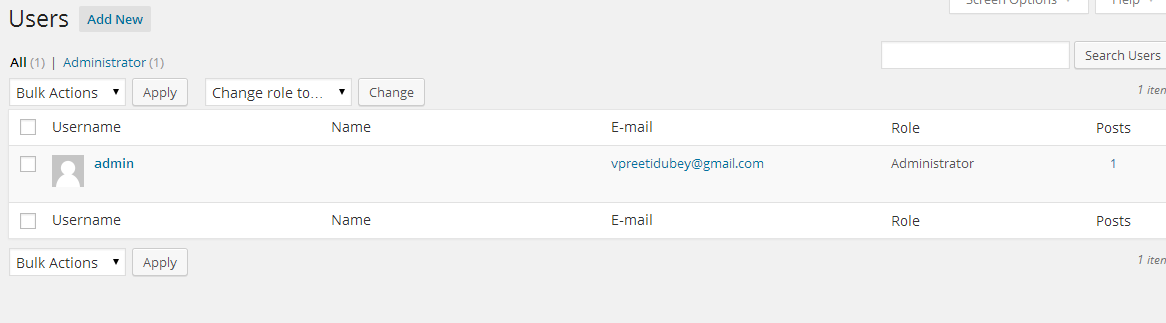
- Users
- All Users: You can add, edit, delete and search users of your site.
- Add New: You can add new users from here. Added user can login to your site.
- Your Profile: You can add/update your name, e-mail address, password and other information.
- Tools
- Available tools: In this section you will find a bookmarklet "Press This", this bookmarklet allows quick posting and publishing using a browser favorite button. You will see a link categories and tags converter script that will take you to the Tools Import Screen.
- Import: You can import data from external sources.
- Export: You can export posts, categories, comments, tags and custom fields from your site. You will get all the data in XML file format.
- Settings
- General: Here you will find the basic configuration of the site such as Site title, tagline, who can register to your site, time and date format.
- Writing: You can modify formatting, set default category and post format. Use Press This button to capture content from any web page and publish on your site. Set up to publish a post via email. You can add "Update Services" here so whenever you add a new post to your blog WordPress will automatically notify to all that services that you've updated your blog.
- Reading: You can set your home page either post, or a "static" Page. You can also decide that how many posts should display on the home page. Also, you can modify syndication feed features.
- Discussion: You can control on incoming and outgoing comments, e-mail notification, Avatars and their ratings, Pingbacks and trackbacks.
- Media: You can organize your media file from here. Manage dimensions of images for post.
- Permalinks: By default WordPress use URLs with query string, you can change the URL structure with the help of permalinks.
One more point for recent version that you don't get links menu in the admin as it was in the older version.
If you want it, you need install links manager plugin to add links menu in the left navigation.
If you have any question, please leave a comment.
No comments:
Post a Comment